Sadly Christmas has come to a close, and this is the first year since starting full time work where I’ve been back at work the day after boxing day! It is definitely a struggle getting motivated when you are still in a food coma from the past couple of days, and yet all I can think about it how good some more Gingerbread or rum balls would be right about now! Probably for the best that they aren’t easily accessible at work otherwise I would be the size of a house by now!
I’m so sad that the Christmas baking has come to an end for another year, it’s just so good! I wish that Gingerbread was a year long thing because it is probably one of my favourite cookies to eat, and don’t even get me started on Christmas pudding! But again, it is probably for the best, otherwise I wouldn’t be able to control myself, and come next Christmas I might not appreciate the delicious baked goods on offer!
As we’re staying at the coast this week with my partners family, I haven’t had much of an opportunity to cook something to share on the blog. But I thought it would be a good opportunity instead to revisit one of my favourite Christmas recipes from the blog, and one of the first ones that I posted almost 3 years ago! Pretty much every year since I’ve baked this for Christmas gifts, and so I figure something that I keep going back to so much deserves a rehash! I know the blog has changed so much in those three years, and so it is high time I refresh some of my recipes!
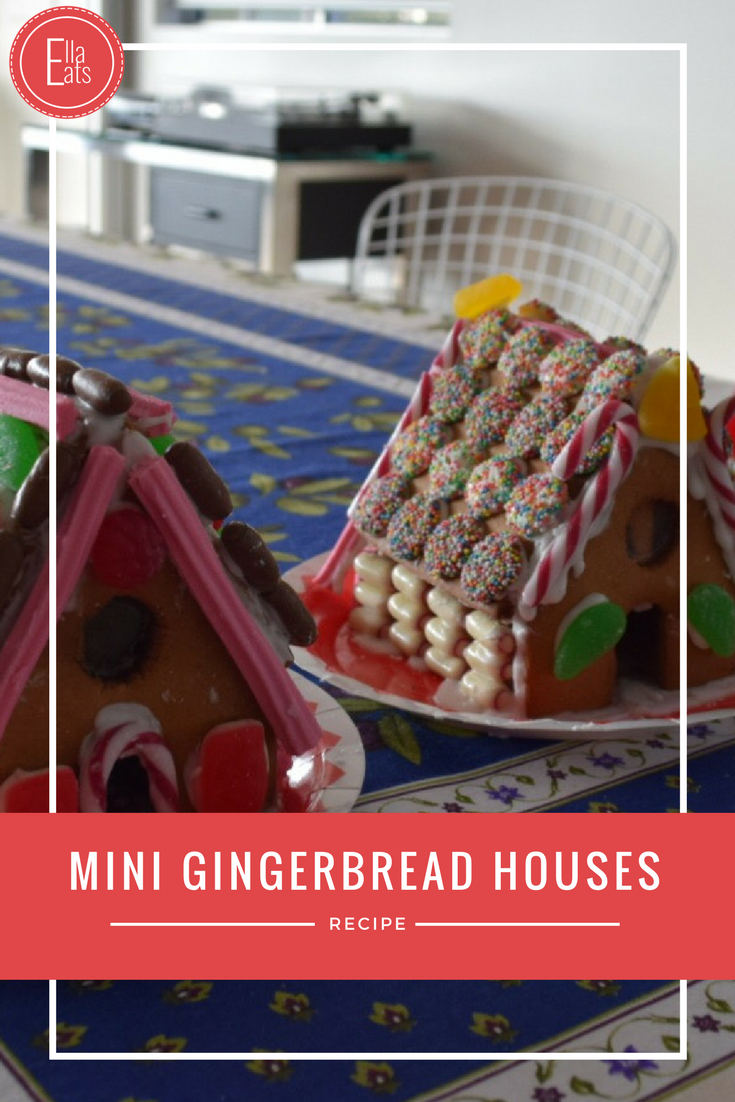
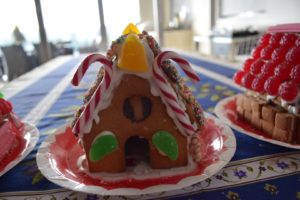
I’m talking about my recipe for mini Gingerbread houses that I give as gifts to some lucky work colleagues each year for Christmas. Although they can be quite complicated to make, especially when it comes to construction, these Gingerbread houses are always a hit, and the smiles on faces that I get when I give them are well worth the weekend of effort. I wanted to share this recipe because these are so great for Christmas, and just about the ultimate Christmas baking exercise.

So here it is, my step by step near fool-proof process for building Gingerbread houses! I feel like I’ve gotten this down to a fine art and really perfected it, so I hope this might help you in your next baking endeavor next Christmas!

- 5 ½ cups self-raising flour
- 1 ½ cups of plain flour
- 1 ½ tablespoons of ground ginger
- 3 teaspoons ground cinnamon
- 1 ½ cup firmly packed brown sugar
- 280 grams butter at room temperature chopped
- ¾ cup golden syrup
- 3 eggs lightly beaten
- 5-6 hard boiled lollies, crushed
- 2 egg whites
- 3 cups pure icing sugar
- 2 packets musk sticks
- 2 packets large candy canes
- 2 packets raspberry lollies
- 2 packets chocolate bullets
- 2 packets chocolate freckles
- 1 packet red gummi clouds
- 1 packet green mint leaf lollies
- 1 packet Christmas themed lollies
-
In the bowl of a stand mixer, combine the flours, ginger, cinnamon, sugar and butter until combined, and the mixture resembles breadcrumbs.
-
In a small bowl, whisk together the eggs and golden syrup until combined, and add the egg mixture to the dry mixture while the stand mixer is still running. Beat until the mixture just comes together.
-
Turn the dough onto a lightly floured surface and kneed until smooth (a couple of minutes). Cut the dough into 3 sections and cover each in plastic wrap. Place in the fridge overnight.
-
When you are ready to bake, remove from the fridge 30 minutes prior and preheat the oven to 180C.
-
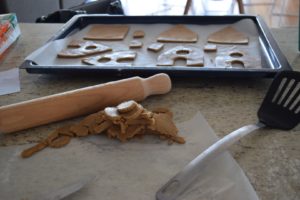
Flour the benchtop, and place on piece of gingerbread dough on the bench. Using a floured rolling pin, roll the dough into about a 5mm thick piece (note: if the dough gets a little dry, add a little water by sprinkling over the top).
-
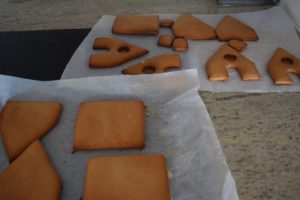
Once you've rolled out your dough, use this template to cut out the pieces. If making 4 houses, make sure you cut enough pieces out of the dough including 2 walls, 2 roofs and a front and back (the front should have the door and window cut out as per template). Roll more dough as required.
-
Carefully place the pieces on a baking tray lined with baking paper and set aside (a wide spatula works well). Before baking the front pieces, place the crushed hard boiled lollies in the window hole with enough to fill the space.
-
Bake each tray of Gingerbread for about 12 minutes, or until the pieces are golden brown. Leave to cool completely and harden at least for an hour, if not overnight in a container.
-
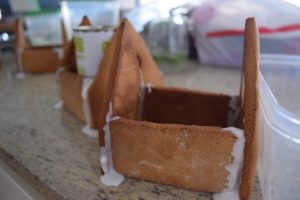
Once you are ready to assemble, add the egg whites and the icing sugar to the stand mixer with the whisk attachment and beat until the mixture goes thick and is completely smooth.
-
To assemble the Gingerbread houses, firstly get a base, such as a Christmas themed paper plate to use as the base.
-
Get each piece of Gingerbread and, one house at a time, generously dunk each edge, starting with the sides and front and back of the house, in the icing. Glue each piece together and keep steady with cans or containers until dried, about 20 minutes. Repeat until all houses have the base glued together.
-
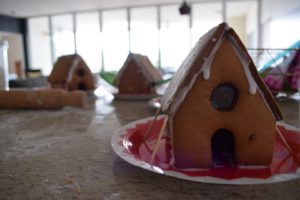
using the roof template, mark out a square on each plate, and cover in a line of the royal icing. Place each house on its plate, and add royal icing as required to glue them down.
-
For the roof, pipe a generous amount of royal icing onto the top parts of each gingerbread house. Add the roof parts, and pipe additional icing to the top of the roof. Hold for about 3 minutes for each house to allow to set, and use toothpicks to hold up the roof while it dries completely, about 30 minutes (don't be disheartened if this doesn't work the first time, just try again! It will stick eventually).
-
When you are ready to decorate, add the remaining royal icing to a piping tool. Decorate each house to your liking using the candies you have purchased. I particularly like raspberries or freckles for the roofs, musk sticks or candy canes for the joins of the houses, and bullets or caramels for the sides. You can then add christmas themed lollies to make them look more festive on the front and back!
-
Cover in cellophane and tie off at the top with a ribbon and a name tag. Keep cool until you give them out.

And there you have it! It feels good to revisit this recipe and rewrite it, as I was following the one I wrote a few years ago and I was thinking of ways to improve it now that I’ve tried it a few times. All I know is that it was definitely ready for a refresh, so here we have it! Next year I’ll be able to print it out and easily follow it through rather than scrolling up and down, so I hope that it helps you too!
This recipe may seem a bit complex, but it is actually really fun! The best part is definitely the decorating, and the pain of the assembly is totally worth it for the fun you’ll have putting the candy on and dressing them up! If you can, I’d suggest getting a friend or family member to help you out, I know my partner was a huge help this year when one of my Gingerbread houses insisted on not being glued together (I was about to break down so he had good timing coming in with a cool head that’s for sure). Nothing beats this recipe for gifts for those that mean a lot to your life, and are sure to get some smiles on people’s faces around Christmas!

What I love about these houses is that they aren’t as daunting as making a big Gingerbread house, even if you make more of them. They feel a lot more achievable, and I like that you can mix it up with the decoration to give each house a certain personality. They’d be really fun to use as a Christmas table setting too rather than one house as they could be a cute little village! Or you could just make one small one and a lot of Gingerbread cookies! It’s really up to you.

Until next time, happy eating!
Ella xx