I know that I’m reminiscing through pins a little too much about Christmas baking, but its just so much fun! And I really would love to share with you my mission to make Gingerbread houses. It really was a bit of trial and error, and so if I could make it a little easier for some of you, or inspire you to endeavour on this challenge, then I would be happy!
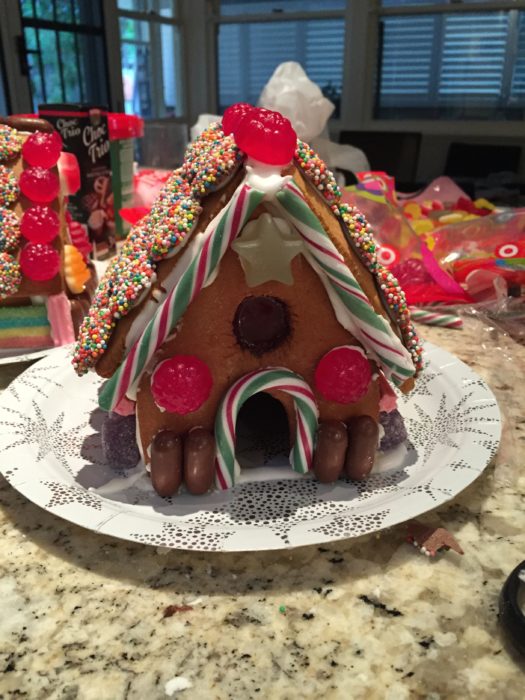
I decided that I wanted to make Gingerbread houses as presents for the people I work most closely with in my team at work (Obviously I would have made them for everyone if I had the time/patience/was a God of baking, but I had/am none of these on my side). I felt like this would be a nice gift, as it takes a lot of effort, which I think those special people around you deserve, and are really appreciate of the gift! They look really nice when you finish them, and the person you give them to can take them home and eat them when they feel like it, as they keep well. And just look at the finished product:

It took a lot of planning to make the 4 houses. But I decided from the start I would make smaller ones just to make it a little easier on me. I looked up ideas of lollies, layouts, designs and methods to make them the best way I could. I also didn’t practice, which meant that I needed to make it work first time! I really had all the odds against me. The last gingerbread house I made was more like a fort with my partner. We didn’t think through the layout completely so as a result it ended up being a sieged castle that had been overrun by gummy snakes (always remember that artistic license is important when making gingerbread houses). But it was a bit of fun, and I think that’s how you need to approach it! If you get to serious, I swear the gingerbread knows and buckles, or doesn’t bake properly. So just relax, and enjoy the process. And spread it out over a few sessions, like I decided to do, as it really helps you keep your sanity.
I’ll split this post into 3 parts: Making the dough, cooking the gingerbread, and assembly. This should give you a step-by-step, easy way to make 4 gingerbread houses. Feel free to adjust as you see fit. As I said, there is no real right or wrong way to decorate your gingerbread house, so you might want to change the way you do it to what I did. But I’d love to see the result if anyone recreates it!
The Gingerbread Dough
I used my favourite gingerbread recipe, which is super simple to make and hasn’t let me down in the past few years! I got a lot of comments about how delicious it was when I gave out cookies along with the gingerbread houses, and so I’d highly recommend it for simplicity and tastiness!
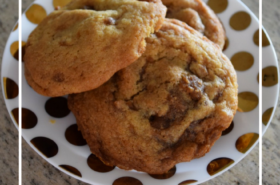
The only problem was that when I rolled out my batch, I soon realised that I didn’t have quite enough dough (I was only one roof piece short!). So I made another whole batch of the gingerbread, which I used to make gingerbread cookies for everyone else. This could be a good way to do it, as you will have excess for this, or in case of emergencies/baking disasters. However, for the sake of the blog, I’ve recreated the recipe I used for 1.5 batches of the original, which should still give you plenty left over to have some fun with!

Basic Gingerbread Dough
Recipe from Taste.com
Ingredients
- 5 1/2 cups self-raising flour
- 1 ½ cups of plain flour
- 1 ½ tablespoons of ground ginger
- 3 teaspoons ground cinnamon
- 1 ½ cup firmly packed brown sugar – I used dark brown sugar to make the gingerbread taste a little more syrupy
- 280g butter at room temperature, chopped
- ¾ cup of golden syrup
- 3 eggs, lightly beaten
Method
- In a large bowl, combine the flours, ginger, cinnamon, sugar and butter with a beater (If you don’t have a beater, I’ve used a food processor before). Do this until the mixture resembles breadcrumbs.
- Whisk together the eggs and the golden syrup in a jug until combined.
- While the beater is still running (the benefits of using a food processor), add the egg mixture to the dry mixture until it just comes together. You might need to stop and push the sides down with a spatula in order to ensure everything gets mixed correctly.
- Turn onto a lightly floured surface and kneed until smooth (this will take a couple of minutes.
- Cut the dough into 3 sections and cover in plastic wrap. Pop this in the fridge for at least 4 hours.
I chilled my first batch for a few days and my second one just overnight. I have to say it was better only chilling it overnight; the dough was much easier to work with and wetter, which is what you need for rolling it out.
The Baking
When you are ready to bake your Gingerbread, you will firstly need to find a good template. Luckily, I have already had a look through Google and found one I was happy with. It worked really well in the end, as I found that a lot of them were either far too small (like those cute ones that sit on your coffee cup!) or too big. Eventually I found one I was happy with, and it was a perfect size to fit on the plates that I had bought to put the houses on. Find the template here. I used the template for the roof, the sides and the front and back. You can do the chimney if you want, but I thought it might be too fiddly.
Once you are happy with the template, cut it out and get ready for cutting out the dough.
Method: Cutting out the dough
- Preheat the oven to 180 Degrees Celsius.
- Get your dough out of the fridge and let it sit for a bit (if you are in Summer it should take no time at all for the dough to heat up). I just found it a lot easier to manipulate once it wasn’t so cold!
- Take each portion and place it between 2 pieces of baking paper. Use a rolling pin or other suitably round object to roll the dough out into 5mm thick pieces. Alternatively you can flour up your bench and do it without baking paper. If you do this remember to flour the rolling pin. My dough got a little dry so I used a little water between rolls to soften it up (this is what I needed to do with my first batch to get it to come together a little better).
- Using your trusty template, which hopefully by now you have cut out, use a knife to cut through the dough in the shapes that you need for the houses. I needed 4 of each piece of the template, so make sure you don’t forget any pieces!
- Carefully place these pieces on a baking tray lined with baking paper. I used a wide spatula to transfer the gingerbread across to prevent it from warping too much.
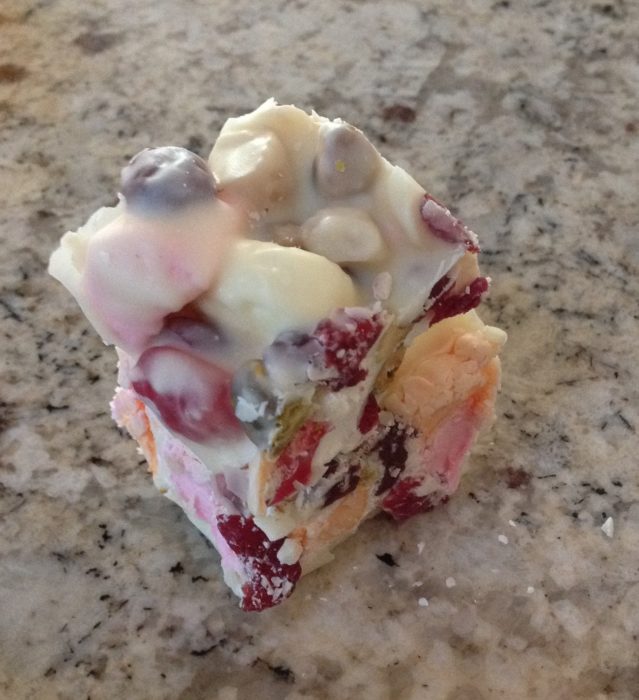
- For the little hole that you see in the template, sort of like a window on both sides, I did something that ends up looking awesome. You can get finely crushed hard-boiled lollies and crush them up finely to make a neat little stained glass window. Place the crushed candy in the window hole, and then bake as normal. The candy will melt and fill the space out. When the gingerbread cools it will harden again, making a great stained glass looking window! I used red candy to keep it Christmassy, but you could use any colour, or even mix them up if you want! I did this on the side of the gingerbread without the door, but you could do it on both if you wanted. I only did this on one of the houses, as I was worried it might affect the structural integrity of the house, but it seemed to hold fine!
- Bake the Gingerbread for 10-15 minutes. I only needed 12, as at 12 minutes the dough was a darker golden colour, and verging on firm, but was still soft when I took it out of the oven. This meant that it as it cooled it hardened up perfectly for the house. I prefer my gingerbread soft, so this was good for how I liked it. You could leave it in a little longer if you want it harder, but just make sure you keep watching it to stop it from burning!
- Place on a wire wrack until cool.
I actually cooled my gingerbread components, counted them a few times to ensure I had enough, and then placed them in a container. I did this so that I could leave the assembly until the following day, so that I was in a more creative mindset. If you are ready to keep going, feel free to, but just make sure that the gingerbread is 100% cool. Otherwise leave the assembly until you are mentally prepared.
Once you are in a creative mindset, gathered your lollies and have psyched yourself up with a good pep talk, you are ready to decorate!
The Assembly
This step is the most fun out of the whole process. But I think rather than calling it the assembly step, it should be called the “glue the house together and pray it doesn’t fall apart” step. Up until now, it’s pretty simple. This is the step that separates the mice from men, the bakers from the imitators. Well, I shouldn’t get too ahead of myself, but you get the idea.
I will list the ingredients I used for my gingerbread houses, but it’s really up to you what you want to put on it. I looked up a few sites and was able to find some really good inspiration. So feel free to use mine as a guide, but take a look in your supermarket and come up with your own ideas. That’s the best part!
Firstly, you will need to make a glue to stick the houses together. And I don’t mean clag glue, I mean royal icing glue, which I can guarantee will be far more delicious than the real thing.
Royal Icing Ingredients
- 2 egg whites – lightly beaten
- 3 cups of pure icing sugar
Method
- Beat the egg whites using an electric mixer until soft peaks form.
- Gradually add icing sugar, and beat until the mixture goes thick
To assemble the gingerbread houses, I first got some Christmas themed cardboard plates to use as the base. I then set out to glue the pieces of my gingerbread together into a house, which is the hardest part of the whole process.
I firstly attempted to glue the houses together by putting the icing into a piping bag and using this to draw really neat lines between the joints of the house. However, the issue was that I couldn’t get enough icing to really solidify the joints, and so the houses ended up not staying together, which is clearly not ideal.
I then had a look at this recipe from Raspberri Cupcakes and she had the great idea of throwing neatness to the wind in favor of getting enough icing on the pieces of gingerbread to get them to stay stuck. It was quick, easy and when you are decorating the houses anyway, I think it’s more important to make sure that the houses stay together than making this part of them look pretty.
Grab your bowl of icing and dunk the pieces of gingerbread into the icing, ensuring that you get a good amount on the sides. Start with the four wall pieces, sticking them all together and using cans from your pantry to keep them upright if needed. I found I didn’t actually need to do this as the icing was nice and strong, but it will just depend on the consistency of your icing.
I found I needed to leave the houses for about 20 minutes to ensure that they were nice and firm. So set these aside and play the waiting game. If you come back to them and the icing isn’t completely dry, leave them for longer. It’s really important that you don’t move them until they are really dry.
Next, set out gluing them to the plate. I used the piping bag to do this so that I got a really neat line. I used the roof piece template and drew this onto my plate to give me a guide of where to pipe (you’ll find this will pretty much give you the right size). I then stuck the gingerbread house down; using my piping bag on the inside to make sure any joints that weren’t covered in icing yet would stick. Leave this for 30 minutes at least. They should look something like this:

Next is the hardest part, as you will have gravity working against you: the roof. Make sure you have some suitably sized props for the roof pieces ready to go. Then pipe some icing onto the top of the gingerbread house walls (make sure you use a lot). Dip the sides of the roof that will come together at the top in the icing and stick down. I held these on for a few minutes just to help it start to dry. I then put the props in place to make sure the roof stayed put. After it was all secured, I went around with the piping bag and added the icing into any holes that were left. Mine looked like this:

Leave this for about 20-30 minutes to ensure that the whole thing is really dry. I know this seems like a long process but it’s worth it to make sure that you don’t wind up with a broken gingerbread house at the end, crying in despair. I only had one mishap where the roof started sliding, which I thought was a pretty good success rate.
The fun part: The candy
The next step is the best part – you get to decorate your pretty little houses! Use artistic license here, I mean who am I to tell you how to decorate your house? As you can see in the photos, I opted to do 4 different houses so that each recipient was getting something different.

Ingredients
- 1 packet of sour straps – These are great to use as they are a. delicious b. take up a lot of space on the house, so are a really good gap filler. I used these on the sides of my houses and on the roof of one.
- 1 – 2 packets of lolly raspberries – There seemed to be some shortage of raspberries when I was shopping (it seemed like everyone else had the same idea) but these lollies are great on the roof of your gingerbread house, or as additional festive decorations on the walls.
- 1 – 2 to 5 packets of freckles. These look really nice on the roof of the gingerbread houses, and I didn’t have enough. Buy as many packets as you can, as these are a classic decoration and you will want to eat a couple as you go/there will be broken ones in the bags
- 1 packet of chocolate covered liquorish bullets – I really don’t like liquorish, so I used raspberry flavoured ones to make it more delicious. These look great stacked up on the side to make the gingerbread house look like a log cabin, or along the joins of the house.
- 1 packet of musk sticks – and obvious staple, these look great to hide any messy gluing work
- 1 – 2 packets of jubes – You need a few packets of these if you want to go super festive, as you can pick out the red and green ones from the packet and just use these. For the rest of the colours, I suggest eating them.
- 1 packet of Christmas themed lollies, or lollies of some other description – I found great Christmas lollies in my supermarket which had all kind of cute shapes. These I stuck all over the house walls.
- 1 packet of candy canes – I broke these off to use in the doors, and used them in the joints.
Optional extras: These are things I was going to do but didn’t
- Making a snowman out of marshmallows for the front of the house
- Using boiled lollies to make a path up to the house
- Using a chocolate as a chimney on the house
I think ideally I would have liked more freckles and jubes to use on the roofs, but you have to make do with what you have! I found that my houses had really low walls in the end as well, so I didn’t find the need to put windows in. Instead I covered the sides with chocolate logs to make them look like cabins, or sour straps because they were just about the right size when I cut them up.

A great idea that I used from the Raspberri Cupcake post was to cut the top off the candy canes and use these around the doorways. I then used the bottom straight bit of the candy canes on the roof beams. I think this made it look especially festive. Chuck on a couple of festive themed lollies and hey presto! You have your gingerbread houses!


I then wrapped these up in cellophane, tied a ribbon around them, and added gift tags. I think that these made really great Christmas gifts, and I don’t think it was too difficult when you split the process up over a few days. Just be patient, and you should be fine! And even if they are a little rough around the edges, Gingerbread houses are just impressive when they stay together, so they are sure to be a hit! And here’s a shot of me with the finished product:

Until next time, happy baking!
Ella