For my first post I thought it might be fitting to share some of my Christmas baking with you!
I wanted to make something simple and delicious that I could gift to my work colleagues. Seems like a simple task, surely? Well I don’t know about anyone else, but I spent hours trawling through recipes trying to pick something to make. There is almost too much choice, making it difficult to narrow down! I can’t believe how many Christmas recipes there are out there, literally everything you could think of.
I found two recipes for rocky road, and I mean, who doesn’t love rocky road? One was for white chocolate rocky road that was gluten free, and I was pretty keen to try it as one of my work colleagues is coeliac. I also settled on a peppermint chocolate rocky road which looked divine. Rocky road is one of those things that I’ve never tried before, but can’t believe that I haven’t. Its so simple when you get down to it: buy the ingredients, crush them up, pour melted chocolate over them and cool. Simple! It was the perfect recipe to give out, as it looks impressive, is delicious, but super easy to make.
I’ll detail the process below, first for the white chocolate rocky road, and second for the peppermint. As for a favourite, I think the peppermint was the real winner out of the two, but it really depends on your preference.
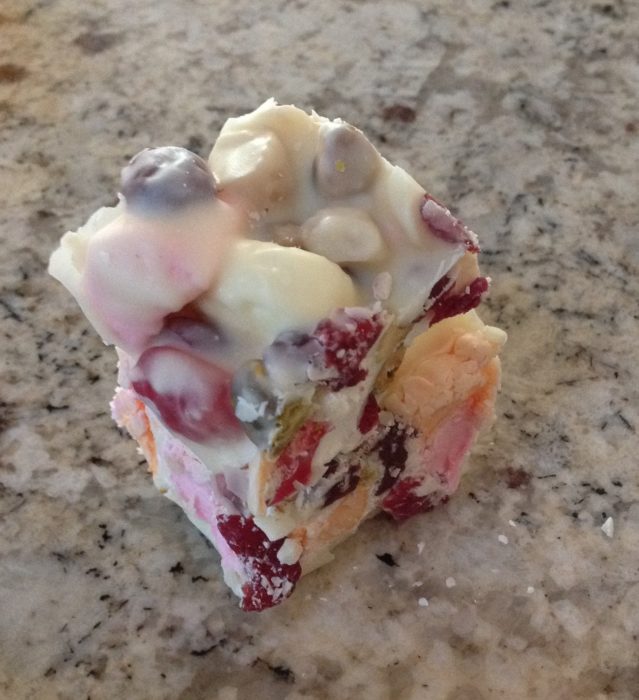
White Chocolate Christmas Rocky Road
I bought the ingredients for both rocky roads at the same time, which was good as they did call for similar ingredients. But I did have a big issue with this one when I went to the store. I’m not sure how readily available gluten free items were for the writer of the recipe, but I know now that in my supermarket all lollies contain gluten. This was a real eye opener for me, because I just wouldn’t think of gluten being in something other than bread and wheat. Turns out I really don’t know anything!
So after a bit of deliberation I decided that I would scratch making this gluten free. There just weren’t any gluten free alternatives for marshmallows, jelly candy, or jubes in my supermarket, plus if I substituted it would have become far more expensive. Instead I just made a gluten full rocky road version of this recipe. I guess if you have the options you could make this gluten free, but I just didn’t have the choices.
This recipe is delicious, as it has toasted pistachios and macadamias in it, which give it a nice crunch without putting biscuits in. The white chocolate also made it look a lot more Christmassy when paired with red lollies. It was really simple to make and I would recommend this recipe to anyone.


- 400 grams of White Chocolate melts– I just used the supermarket brand as I believed that the ingredients would make up for using cheap chocolate. If you want it more decadent, use a high quality brand
- 56 grams of unshelled pistachios lightly toasted (I put these in the oven at 150 degrees for about 7 minutes, or until the kitchen got a nutty aroma
- 56 grams of macadamia nuts
- 170 grams of multi colored marshmallows – I used the Pascal brand marshmallow packet that comes with 4 flavours: strawberry vanilla, peach and banana. Could have done without the banana, but that’s just personal preference!
- 85 grams of red frogs chopped into chunks. For some reason the only red lollies I could find were red frogs, as there appeared to be a Brisbane shortage of rasberries! So I just chopped up the red frogs really finely. I decided to use these instead of multi coloured lollies as the recipe called for in order to make the rocky road more Christmassy.
- 85 grams of dried cranberries
-
Line a baking tin with baking paper and set aside. I did this quite roughly in a pretty deep, square tin. It depends on how thin you want the rocky road to be, the smaller the tin in length and width, the thicker it will be
-
Chop up the macadamias, marshmallows and red frogs and pop into a bowl. Ensure that the pieces of marshmallow are small enough so you don’t end up with them taking over the rocky road, which is what seemed to happen a little bit with mine! Then add the pistachios once they’ve cooled a little and the cranberries. Mix this all together gently. This is what mine looked like in a bowl:
-
To melt the chocolate, the recipe called for melting it in the microwave, but I personally prefer to do it on the stove. I filled a small saucepan with a little bit of water and placed a heat safe bowl over the top so there were no gaps. I then poured the chocolate melts into the bowl and over a medium heat stirred the chocolate until it melted. Sometimes, the water will boil over and you’ll need to lift the bowl. Be careful of the steam when you do this, its normally best to lift it tilting away from you. Here's a pic:
-
Pour the melted chocolate into the bowl with all the lollies and nuts. Mix this well to ensure everything is coated.
-
Pour this mixture into the prepared pan, and even it out with a spatula.
-
Refrigerate this for a couple of hours, or overnight if you have the time.
-
When you are ready to cut it, take it out of the fridge and get a nice big knife and a chopping board. I was able to cut it quite easily as it was a very hot day, but if you don’t have this on your side, simply heat the knife a little under hot water to make it really easy to cut through the rocky road. I cut mine into about 16 pieces, but yield will really depend on the thickness of your rocky road.

And there you have it! The recipe says it should keep for at least two weeks, but will soften at room temperature. If you live in a hot place like I do, its best to keep it in the fridge, and that way I got more life out of it (until my boyfriend realised I still had some left).
As I said, a very simple recipe, but it looks great when completed! And who doesn’t like rocky road? You wouldn’t even need to keep this treat for Christmas only. You could add any lollies you wanted for an all year round treat.
Peppermint Chocolate Rocky Road
This recipe is a lot more Christmassy, but was definitely the crowd favourite out of the two! The peppermint twist to this recipe really ensures that it is fresh and delicious in every bite! I would say this one was a little more complicated than the white chocolate rocky road, but it was still quite simple. I felt like I did more with this one, like I might have been a little bit more involved with the cooking process. So if you like something slightly more hands on I’d pick this one!
This recipe is not gluten free by any means, but I suppose the great thing about rocky road is that it is really adaptable to what you want to put in it. If you have gluten free ingredients you can most certainly make it gluten free.
When completed, this rocky road looks like Santa’s elves whipped it up themselves. It’s definitely got a lot of festive character.

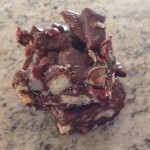
- 150 grams of softened unsalted butter
- 115 grams of milk chocolate melts – Again I used the homebrand chocolate melts, as I believed that it wasn’t worth getting good quality chocolate when there are so many things being added to it. If you are a chocolate purist, feel free to get some really good quality chocolate!
- 230 grams of dark chocolate melts – The recipe did call for good quality chocolate but again I didn’t listen. Feel free to substitute if you’d like to turn this rocky road up a fancy notch!
- ¼ cup of rice malt syrup – The recipe called for corn syrup but I couldn’t bring myself to buy it. Corn syrup really isn’t very good for you, and given that this recipe already adds butter to the chocolate, I felt it could use slightly less bad stuff (I know, it’s a little contradictory). Lets just say using an alternative makes you feel slightly better knowing that you are giving your friends something a little bit better for them. Rice malt syrup is great as it is sweet but doesn’t have as much of a distinctive flavour as honey does.
- ½ a packet of milk arrowroot biscuits crushed, but not too finely crushed. Keep it in chunks to avoid getting crumbs through the mixture
- 2 cups of lollies – The recipe called for 2 cups of mini marshmallows but if I’m honest with you I forgot to buy enough for both rocky roads. So I combined the rest of the marshmallows and the rest of the red frogs together and finely chopped them. If you are smart enough to remember to buy enough marshmallows, no need for this! But the red frogs did add a little something to the rocky road
- 6-8 Candy Canes
- ½ cup of Christmas m and m’s or other red chocolate candies – the Christmas m and m’s were perfect for this rocky road
- 1 teaspoon of peppermint extract
-
Make sure your biscuits are crushed into largish pieces, and that your lollies are all ready to go
-
Crush your candy canes to within an inch of their lives. I put them in a freezer bag and bashed them on the bench. This was very satisfying, and I’d highly recommend this method. The candy canes need to be crushed fine so make sure you give them a good bashing.
-
Place the lollies, biscuits and coloured chocolate in a bowl with the candy canes. Leave the marshmallows out. Set aside.
-
Line a pan with baking paper and set aside. As with the white chocolate rocky road, the smaller the pan, the thicker the rocky road. I only had a long, rectangular pan, so mine ended up being thinner. This worked will with this recipe though.
-
Place a bowl over a saucepan that has a little bit of water in it on a medium to low heat. Ensure the bowl seals up any gaps. Place the chocolate in the bowl and melt it, stirring frequently. Then add in the butter and rice malt syrup and stir until smooth. Take off the heat.
-
Pour the chocolate mixture of the lollies and chocolate that you set aside earlier. Fold the mixture gently until everything is covered well.
-
Add the peppermint extract and stir through.
-
Add the marshmallows to avoid them melting. Stir through.
-
Pour the mixture into the pan and smooth with a spatula.
-
Place in the fridge and cool for at least four hours, or overnight if possible.
-
Place the rocky road on a cutting board and get a nice big knife. If it’s a hot day you’ll be able to chop it easily, if not run the knife under hot water to make this a little easier. I chopped mine into about 16 pieces.
-
You can dust it with icing sugar to make it look really nice. I honestly forgot to do this…whoops!

And voila, There you have it! Two rocky roads all ready to go. I put these into nice little Christmas goodie bags along with some gingerbread cookies, and presented them to my work colleagues. They all really loved them, and I think it worked as a great gift. I managed to give them 2 squares of each rocky road, which was a pretty good size!
I’d highly recommend giving these recipes a go. They were super easy, quick and fun to make. And the finished product looks quite nice. It’s sure to put a smile on someone’s face!
Happy baking!
Ella Eats xx


Arielle
Oh my, they look so delicious!! <3 I can't wait to see your future posts 🙂